Not only for engineers(cliche!): learn to solve the Rubik’s Cube in less than 2h. Rarely has any puzzle lasted so long. Almost fifty years after its invention, the Rubik’s Cube© still keeps its interest for the next generation, getting variants developed so as technical innovations. From Cubers communities with 100s of dedicated online channels, literature, and speedcubing competitions, that puzzle’s popularity is unrivaled.
Initially named the magic cube, the Rubik’s Cube© was invented by the Hungarian architect Erno Rubik in 1974, was first produced in 1977, and became a worldwide success in the 80s.
Thirty years later, at least 350 Million cubes have been produced until the original patent expired and even more millions have been produced since.
We firmly believe that the huge success of the Rubik’s cube is mainly due to its apparently impressive number of combinations (“Must be a Nobel prize to solve that!”) yet with simple design, and simple color principle … but in fact feasible in less time than many 2D puzzles.
Grab a coffee, scroll the page together with the video,
and within 2h the cube is yours!
Solving The Rubik’s Cube
Over the decades, many logic strategies have been developed (see Wikipedia’s link below) with their own sequences to solve the cube bits by bits. Various methods involve more or less complicated sequences to learn. We propose here to learn the simplest method, consisting of solving the cube layer by layer, with not-optimized sequences and preserving what was positioned before. FYI, in many record-breaking methods, or the computerized one indicated at the bottom of this post, you do not see final positioned pieces until the last moves, making it very hard to see the correct progress.
Following the steps and video below, it takes about 2 hours to learn How to solve the Rubik’s Cube© within 5 minutes
The best video tutorial to learn the 3 types of pieces, basic moves, and first combinations (the method is well-known and popularized in many books and sites, but definitely made extremely clear and comprehensive here by TheCubicle):

Two basic sequences will be used repeatedly throughout the method. We recommend exercising these 2 first, in order not to mess up the cube in the middle of the solving and to have to start from scratch again (as we all did!). It is to be noticed that if you repeat any of them 6 times consecutively, the cube returns to its original state:
the “Righty ALG” = R U R’ U’
the “Lefty ALG” = L’ U’ L U
Note: the main hand turns & fingers move but if the initial position is correct, it does not need to be repositioned between steps, making these two sequences extremely fast.
Help! one can also enter any combination in this nice online 3D Rubik’s cube simulator to visualize any sequence, such as the two above

Solving the Bottom Layer
- Make the white cross
- First, position the 4 petals around the yellow center: find yourself the basic 1 to 3 moves to place each of the 4 white petals :)
- Then invert the cross: side after side: align the 2nd layer center color corresponding to the one on the same side but on the top layer. Only then turn that full side 180°. Once done on the 4 sides, you should have a full white cross on the bottom face with two aligned same-color pieces on each side.

- Solve the bottom white 4 corners: position the cube to have the white cross on the bottom side. For each corner that is not already white, position the required piece on the first layer, above the desired final position. Then repeat the Righty ALG until the part has reached the correct desired position. Repeat for every 3 corners if not already white.
Solving the Middle layer
With the previous step, all 4 side centerpieces have already in the final position. Just their 4 edges may be incorrect.
Solve the 4 middle-layer edges: for each edge needing to join the middle layer (means no edge with a yellow side):
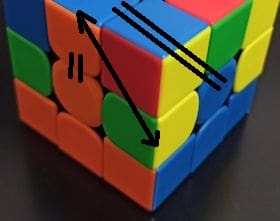
- turn the top layer and position the desired top edge to move above the adjacent centerpiece of the same color (important as that color will stay on the same face after the move hereafter)
- then it needs to join its final position side position on the middle layer by either moving it to the left or to the right of the middle layer:
- if to the right edge: U, Righty ALG, rotate the cube to the left, Lefty ALG
- if to the left edge: U’, Lefty ALG, rotate the cube to the right, Righty ALG
With this second layer, you should now have the 2 bottom layers completely finished
Solving the Top layer, The Yellow Face
Make the yellow cross on the top face (forget about the corners for the moment). The 3 possible situations:
- if only a line of the cross is only already formed: orientate the cube so that the line is horizontal left-right on the top face, and then:
F, Righty ALG, F’ (“F” is a clockwise rotation of the 1 face facing you. F’ being counterclockwise)
- if only one corner of the cross is already formed: orientate the cube so that this partial cross is on the bottom right of the top surface, then apply:
f, Righty ALG, f’ (“f” is a clockwise rotation of the 2 front layers facing you. f’ being counterclockwise)
- if just the center of the yellow cross is already formed: apply 1st step above and you’ll get the corner of the cross, and then apply the 2nd step to get the full yellow cross
Position the 4 corners (but the wrong orientation/twist is OK)
Rotate the top layer so that the maximum corners are in their definitive position (for example the red/green/yellow corner on the corner between the red and the green face. It must be between these 2 faces, but twisted is OK). Then swap the needed corners, if needed, using 2 possible scenarios:
- swap 2 same-side corners: position the cube so that the 2 corners to exchange are placed on the top right, then: 3x Righty ALG, turn the cube to the left, 3x Lefty ALG
Once done the corners are swapped, but you may need to rotate the top layer to reposition all faces together
- swap 2 opposite corners: first swap 1 corner, then a 2nd time, by doing the previous move twice
You have read 58% of the article. The rest is for our community. Already a member? Log in Innovation.world community Login or Register (100% free) View the rest of this article and all members-only content and tools. Only real engineers, manufacturers, designers, marketers professionals.
(and also to protect our original content from scraping bots)
No bot, no hater, no spammer.















Interesting read, but isnt there a quicker method to solve the Rubiks cube rather than 15 steps? Has anyone tried speed-cubing?
Interesting read, but arent there speedcubers who solve it in less than 15 steps? The Yellow Face part seemed oversimplified, dont you think?
please add an explanation of the cube notation (like R, U, L)
solving the cube can improve spatial awareness
There are digital apps and simulators that can help beginners visualize and understand the cube’s mechanics more interactively!
Has anyone noticed how the Rubiks cube solution steps oddly parallel life? Solve the base, handle complexities, then tackle the top challenges. Deep huh?
Related Posts
Contamination Control Strategy & Cleanroom 26 Best Practices
From GMP to cGMP: the Full Mastering Guide
IQ OQ PQ Process Validation: Full Theory & Praxis
The “Lone Nut”, the “First Follower”, and the “Fast Follower” Strategies
Best 20 Usages of Proxies For Engineering
How to Sell Ice to Eskimos (aka Marketing Shenanigans)